
More and more chatbots are being created every day, basically covering every automatable use case. Most of these chatbots are textual, and we can interact with them on Messenger, SMS, website chat, etc. They’re very accessible and easy to use, but I’m sure you’d love to be able to speak to them, as well as write to them.
Sometimes, speaking is the most natural and easiest way to interact, say, when you’re at home cooking or reading. I’ve got some news for you: you can build your own Alexa bot backed by SAP Conversational AI. We made this integration very easy, so let’s dive in, step-by-step.
1. Create Your Bot
When you’re a beginner bot builder learning about natural language understanding, conversation flows and messaging platforms can feel a bit overwhelming. In this guide, I’m going to help you build your first bot on SAP Conversational AI. By the end of this tutorial, you will have a functional chatbot, and you will know how to:
- Make your bot understand human language
- Build a conversation flow
- Deploy your bot to an external channel (Facebook Messenger, Twitter, etc.)
With SAP Conversational AI, you can easily design complex conversational flows fueled by a powerful artificial intelligence.
What are we building today?
Let’s start with a simple bot:

We’ll need to:
- Understand greetings and goodbyes
- Understand that the user is asking for a joke and send one picked randomly from a list
- Understand at least two reactions — laughs or grins — and react with a funny gif or deep apologies
- Deploy our bot on Facebook Messenger
Requirements
- Create a free account on SAP Conversational AI.
- Log in. Click on the button “Start with a template” or just on + NEW BOT in the header section.

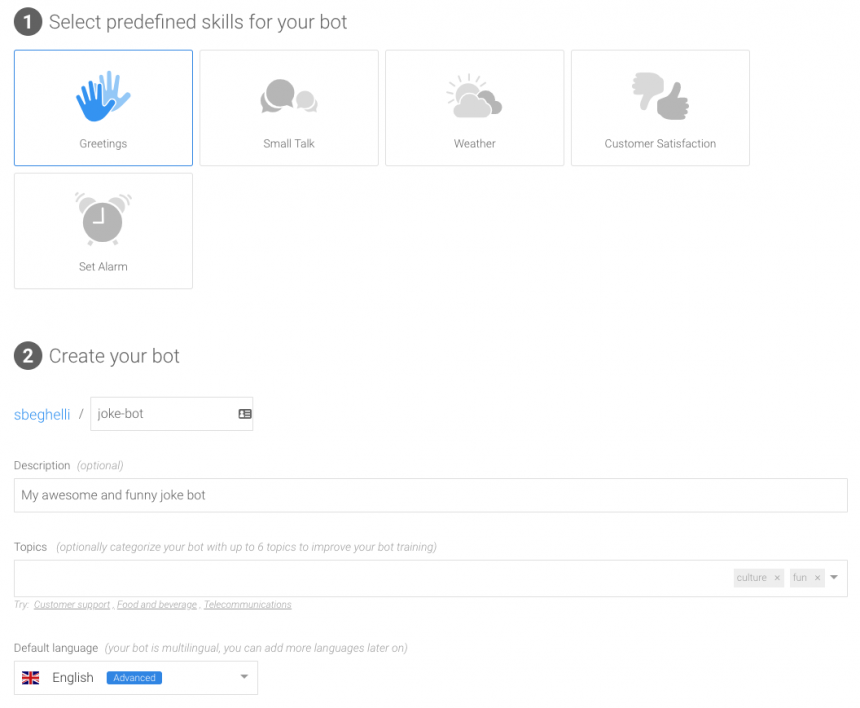
3. You can choose one or many predefined skills for your bot. This will help you get started faster. Just select “Greetings” for now, but I encourage you to check the others later.
4. Choose your name. “joke-bot” would be appropriate
5. Add a description. “My awesome and funny joke bot” or something less cocky
6. You can set up to 6 topics to improve your bot training. Topics are keywords that can define your bot, such as “fashion,” “games,” or “jobs.”
7. Depending on the use of the data, choose the appropriate Data Policy option. Note that we don’t allow “Health” bots (which ask users personal health information) at the moment.
8. Set English as the default language.
9. You can keep your bot public as there is no private info, but you can change this setting later.
You are now ready to build your bot!
The Stages of Bot Building
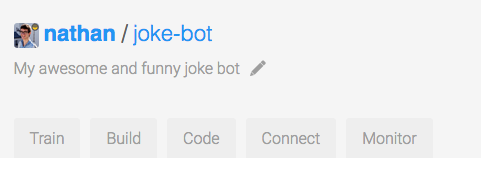
There are 5 phases in your bot life, represented on our platform through the use of 5 tabs:
- Train — Teach your bot what it needs to understand
- Build — Create your conversational flow with our Bot Builder tool
- Code — Connect your bot with external APIs or a database
- Connect — Ship your bot to one or several messaging platforms
- Monitor — Train your bot to make it sharper, and get insights on its usage!
For today, we’ll skip the “Code” part because we won’t need any external information. If you want to connect your bot with some code, I encourage you to comment below and I will make a post on it.
Step 1: Train Your Bot to Understand Human Language
This is the brain of your bot, where all its understanding is gathered and divided into Intents.
An intent is a “box” of sentences that all carry the same meaning even though they can be very different from one another. When a user sends some text to your bot, our algorithm compares it to the phrases in your intents. Then it checks if it’s close enough to one of them and decides what the intention of the message is.
For example:
- Are you a bot?
- You reply so fast, I’m sure you must be some kind of robot.
- Am I speaking to a human or not?
They are all different, but they all ask the same question that we can sum up as: Are you a bot? Well, that would make a great intent! If your bot is able to recognize this question, you can prepare a smart reaction, like “I’m a robot and I’m proud of it.”
Fork Intents
All bots should understand basic things such as "greetings," "agree," "disagree," or when a user asks for help. If you chose the predefined Skill "Greetings" when you set up your bot, you will already have two intents: goodbye and greetings.
As SAP Conversational AI is collaborative, you do not have to recreate each intent every time! You can "fork" an intent someone already created to clone it right into your bot. Since we need to understand that our user wants to be told a joke, let’s find if the community has already created this intent for us.

Type “joke” in the input search. You can click on the intention names if you want to check their full content. The first result will work just fine for me.
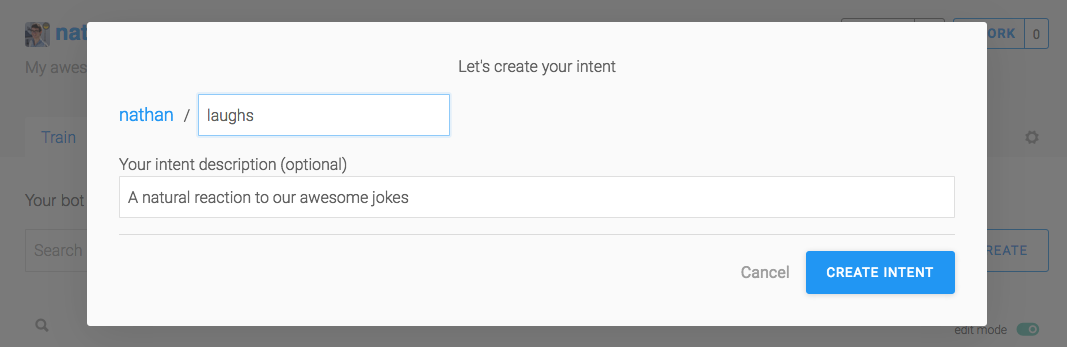
Create a New Intent
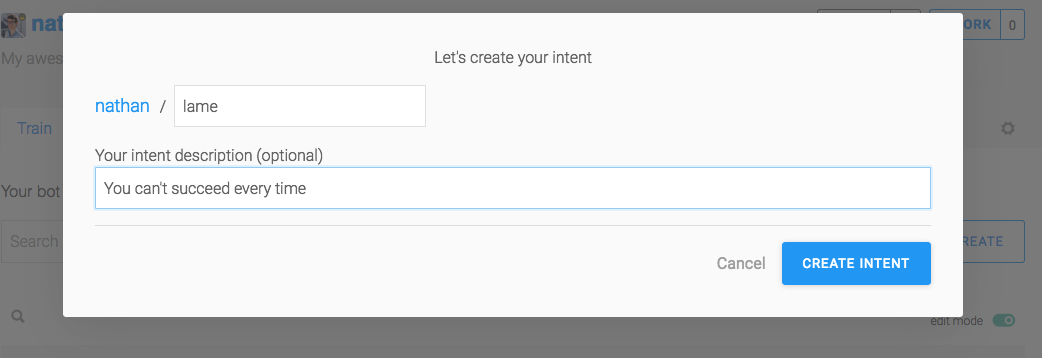
If you want a custom intent, you can build it from scratch. Here, we want the bot to understand when someone laughs at the joke. Click on + CREATE on the right of the search field and choose a name for your intent:
Repeat this process for intent that gathers negative reactions to your jokes:
Step 2: Add Expressions
Now that we have intents, we need to populate them with various expressions. An expression is the name of a sentence added to an intent.
A golden rule would be to add at least 30 expressions to an intent and ideally more than 50.
Click on an intent and add sentences you want your bot to understand.

Put yourself in the shoes of the people talking to your bot. What could they possibly ask? Enter a new expression by typing it into the field Add an expression. Here are some examples:
Laughs
- Hahaha that’s hilarious
- ROFL you’re good!
- That, my friend, was an amazing joke.
- I haven’t laughed that much in a long time
Lame
- You have no sense of humor whatsoever.
- That’s both terrible and offensive.
- What the heck was that?
- Try harder, that was a very bad joke.
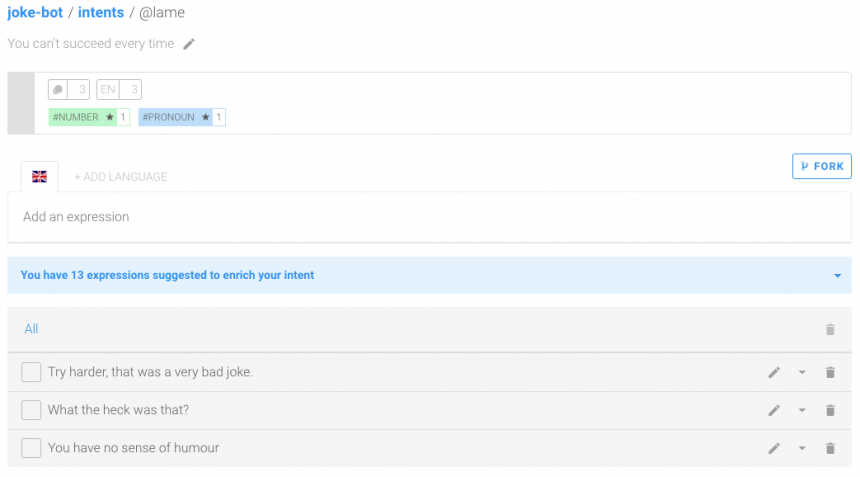
Tip: Click on the message “You have X expressions suggested to enrich your intent” to see examples of phrases you can add to your bot. It's a good way to speed up your training!
Step 3: Test Your Bot
Now that your bot is full of expressions, let’s test it with the console:
Click on the TEST bubble icon on the top right. Type a sentence you have not trained your bot with: “Botty bot, can you tell me a joke please?”
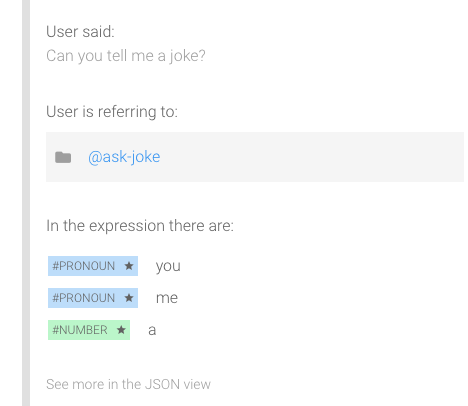
Regarding what you wrote, you will see which intent was detected under “He’s referring to.” If the algorithm did not detect an intent or detected an invalid intent, that means that you need to train your bot with more expressions. Go back to your intents and add or modify expressions. Then, test again. This might sound a bit repetitive, but it’s the best way to ensure that your bot will detect correctly the users’ sentences.
Once you’re happy with your bot intent detection, it’s time to move to the next phase: building your bot flow.
Step 4: Build and Manage the Conversation Flow
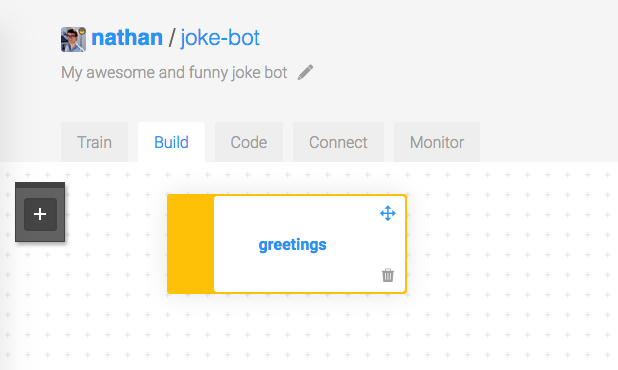
Now that the “brain” of your bot is all filled up, click on the Build tab.
The Build tab is where you find Bot Builder. It helps you construct the conversation flow of your bot using Skills.
What Is a Skill?
Each Skill represents one thing that your bot knows how to do, and they can interact with each other. Your skill can be a complicated one — such as managing payment by credit — or simply answering basic questions.
When you create a new bot, forking skills you already made to the new one will keep making your bots more powerful. You can also fork skills created by other people on the platform, so you don’t have to reinvent the wheel!
If you chose the predefined skill “Greetings” during the creation of your bot, it will already be in your interface.
Click its name to check its details:
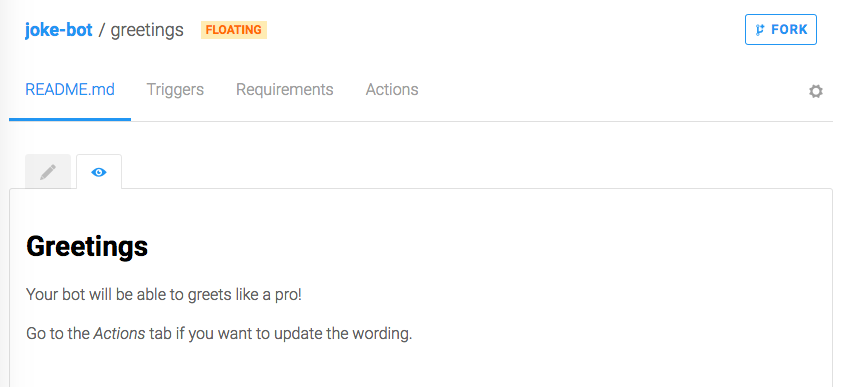
A skill has four parts:
- Readme: Where you explain the purpose of your skill
- Triggers: Where you define why this skill should be activated after a user message
- Requirements: Describes what information this skill has to collect, and what questions need to be asked to fulfill the requirements
- Actions: What to do once the requirements are fulfilled
If you navigate through the tabs, you’ll see that this skill is structured as follows:
- It is triggered if the intention greetings or the intention goodbye are matched.
- It has no requirements because it does not need to collect additional information. That means that it will execute actions directly after a trigger.
- It has two possible actions: If the intention matched is greetings, it sends a random welcoming message chosen from a list, and if the intention is goodbye, it does the same thing but picks the message from a different list.
It’s time to create our own Skill with the same structure.
Step 5: Build Your Own Skill
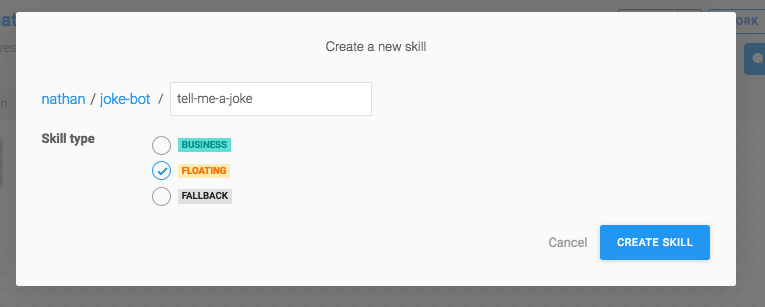
Go back to the Build tab and click on + Create skill on the left side.
You have three different types of skills: Business, Floating, and Fallback.
- Business and Floating have no structural differences. Yet differentiating the two types of skill helps when you have a lot of them.
- Fallback skills trigger when no other skill has their Triggers fulfilled after a user message. Most of the time, you’ll have only one of this kind where you can remind the user what your bot can do and ask them to rephrase.
Our skill will be of a Floating type. Give it the name you want, I chose tell-me-a-joke.
Click on your newly created skill and then go to the Triggers tab. We want to activate our skill if one of the three intentions we created are matched.
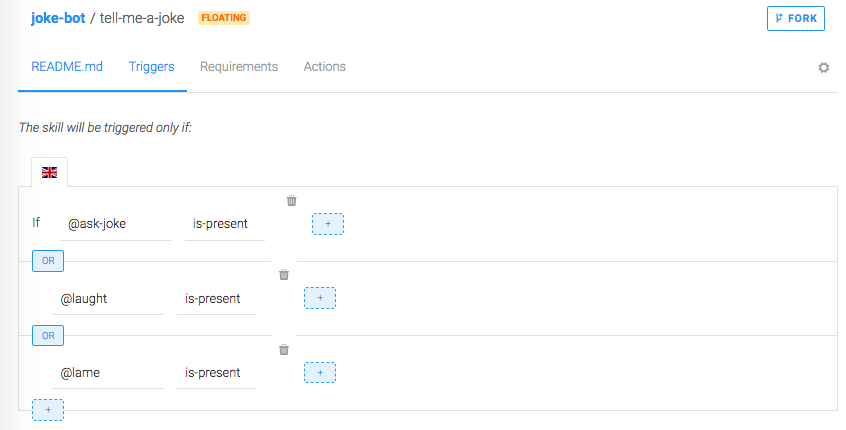
Don’t forget to change the condition to OR — by clicking on one of the blue buttons “AND” — since it is an AND condition by default, and we want to activate our skill when any of these intentions are matched.
We won’t need to do anything in the Requirements because we don’t have anything to ask. But you can improve the bot by asking for some information there, like what kind of jokes they prefer or how old they are if you want to add some adult jokes.
Head to the Actions tab and create your first message group.
Click on ADD NEW MESSAGE GROUP, then ADD CONDITION to trigger messages and add the condition: If @ask-joke is-present. The “@” stands for intent type. We’ll cover other types later.
Then choose the action type “SEND MESSAGE,” choose Text format, and type the best joke you know:
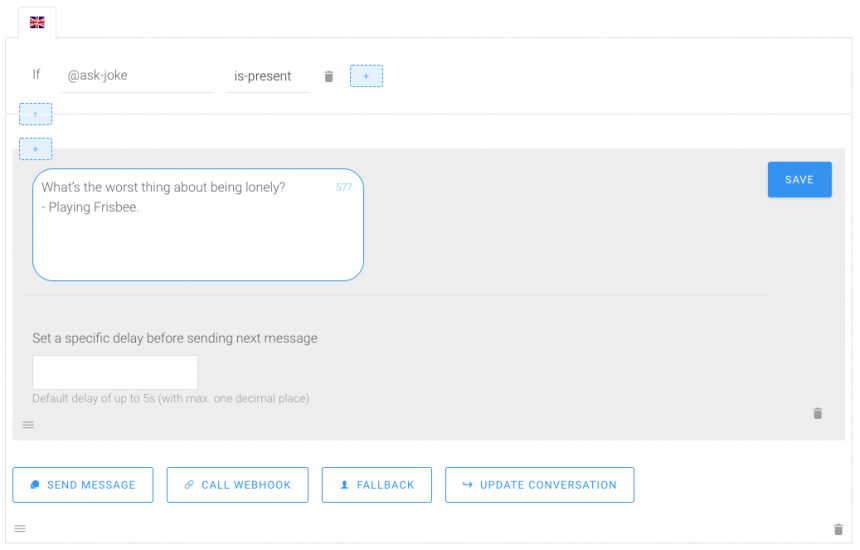
You can also set a delay (optional) between two messages up top 5 seconds. This might be useful when the messages your bot sends are quite long and need time to be read by the user.
Step 6: Give Different Possible Answers to Your Bot
Click on the little + over your message to add a new message to your random list so that we don’t always send the same joke. If you click again on SEND MESSAGE below, you can send multiple messages at the same time.
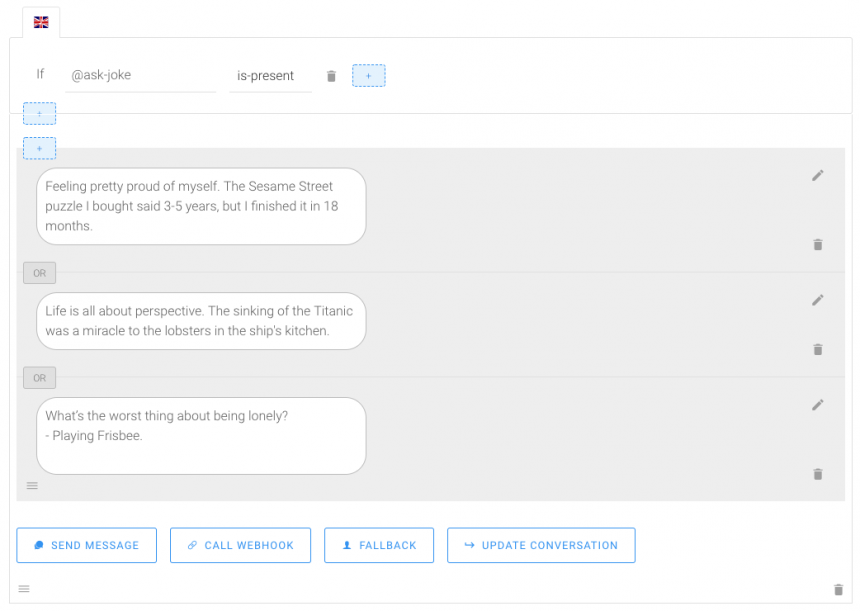
Let your creativity speak!
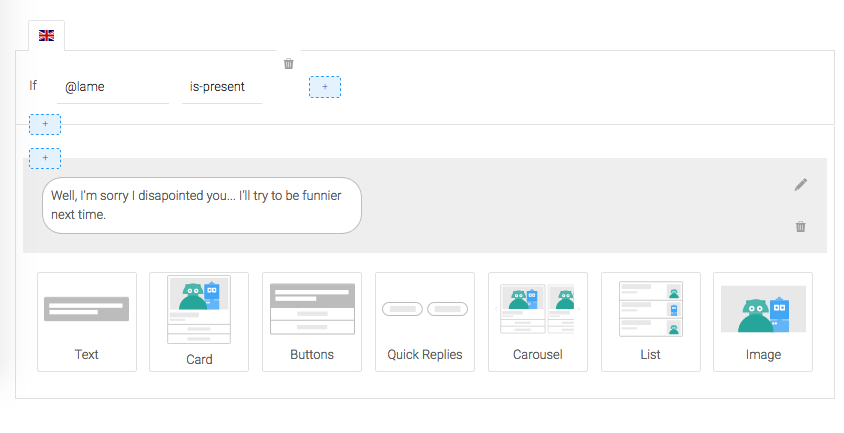
Once we’re good with our jokes, let’s cover the two other intents.
Once we’re good with our jokes, let’s cover the two other intents.
Click on ADD A NEW MESSAGE GROUP and set the condition as: If @laughs is-present
I decided to send gifs in this case, so I clicked on SEND MESSAGE and Image format.

Then, we repeat the process for our last intent:
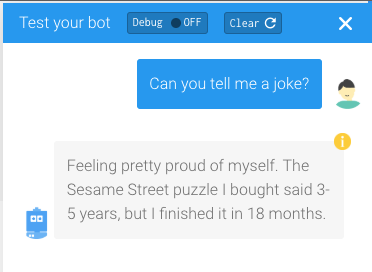
Step 7: Chat With Your Bot
The last step before releasing your bot to your audience: chat with it in a real situation. This will show you exactly how the bot is and reacts as if you were in the shoes of any other user, and you’ll be able to double check any error in the conversation flow (bad answers, fallback error, weird behavior…) and correct it before it goes public. In fact, I recommend you chat with you bot as often as you can during its building, as it will be easier to identify where an eventual mistake comes from.
Click on the bottom-right blue button “CHAT WITH YOUR BOT” and start sending some messages. Use “Clear” to refresh the chat.
Step 8: Connect Your Bot to a Messaging Platform
Your bot is ready? It’s time to deploy it to a public messaging platform.
Go to the Connect tab, choose the messaging platform you prefer, and follow the step-by-step instructions. You won’t have anything else to do other than the initial configuration to deploy your bot to a new channel. For this reason, you should not hesitate to configure multiples to broaden your audience!
Beware that some platforms are not as powerful as others. For example, Telegram is very easy to configure but does not support GIF images, so you should adapt your bot accordingly. If you don’t know where to start, Facebook Messenger is a very powerful platform with a large audience.
Now, go on Messenger, Kik, or any other channel you chose and look for your bot, it’s there, it’s live!
Step 9: Monitor and Train Your Bot
The Monitor tab will help you sharpen your bot intelligence over time.
It gathers all the messages your bot receives and shows what intent was matched.
Keep an eye on this tab and train your bot regularly:
- Archive the message if it matches the right intent
- Assign the correct intent if an invalid intent was matched or none at all
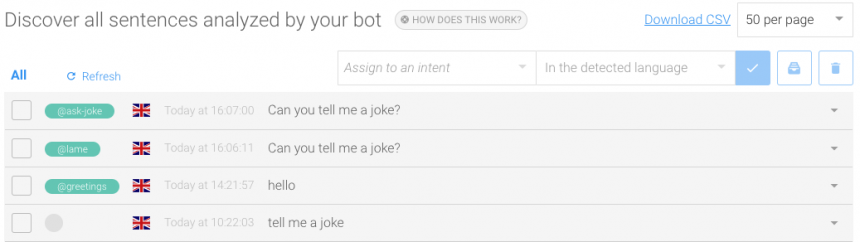
Here, the last message sent to my bot didn’t match any intention. If similar messages keep coming over time, I will create a new intent for this case.
2. Add a Dedicated Intent and Skill
As we’ll see later, your Amazon Skill will be triggered by using an “invocation” (aka a “keyword”). Using this invocation will start the bot and tell Alexa to go to SAP Conversational AI to handle the conversation. Then, we have to tell your bot how to properly react when the user uses the invocation. If not, your Alexa skill will still work, but it won’t know what to answer and will ask for the Fallback skill, which can be very disappointing for the user.
For that, we’ll create an intent and a skill (or, in this particular case, modify an existing skill).

a. Go to the Train tab and click +CREATE. I chose to name my intent conversation-start, but you can choose whatever you want.
In this intent, we’ll add a single expression: CONVERSATION_START. This time, don’t use anything but this specific expression. This expression is what Alexa considers the beginning of the conversation with your bot, once you’ve called the “invocation.”
b. You can create a specific skill to handle the answer of the CONVERSATION_START trigger, but I chose something simpler: the Greetings skill that you already have in your joke bot. The result is that Alexa will answer with a greeting message when using your invocation: “Start funny bot” > “Hello :)”.

On your Build tab, choose the skill Greetings, and go to the Trigger tab. Add a condition with an ORboolean and simply choose “if @conversation-start is present.”

Once you’ve done that, go to the Actions tab and add a condition to the first action, with an OR boolean, and again type “if @conversation-start is present.”
With that done, your bot will use the Greetings when prompting the invocation, as if you were simply greeting it.
With that done, your bot will use the Greetings when prompting the invocation, as if you were simply greeting it.
This is the only modification you’ll have to do to make your bot Alexa-compatible.
3. Create an Amazon Alexa Developer Account
If you already have an Amazon Alexa developer account, nothing more to do! Just log in. If not, go hereand create one. It’s completely free!
Once you’ve created an account, don’t create a skill through the Amazon platform. We handle itfor you through your bot’s Connect tab.
4. Authorize Amazon to Connect to Your SAP Conversational AI
Go to the Connect tab of your bot and click Amazon Alexa. Go to Step 6 (under Amazon Alexa on the Connect tab) and click LOGIN WITH AMAZON. Once you’ve done that, you won’t have to go back to this action.
5. Choose an Invocation Name and Generate Your Alexa Skill
We’re almost done!
Under Amazon Alexa on the Connect tab, stay on Step 6 and choose a name for your Alexa skill. Feel free to personalize it.

Choose an invocation name. As I was previously saying, this is the “magic” word that will make Alexa switch to your SAP Conversational AI bot. I chose funnybot. Note that you can change it later, so don’t worry if you made a mistake!
Once you’ve chosen an invocation name, click the CREATE CHANNEL button and wait. The system will take a few seconds to reload and then the Vendor and Locales lists will be available.

Choose the unique option in the Vendor list and choose US in the Locales list. Then click DEPLOY SKILL TO AMAZON ALEXA.
There we are! Connection’s done!
6. Test Your Skill on Alexa
Go to your Amazon Alexa dev page and refresh the page. Your skill will now appear! Click on your skill’s name and go to the Test tab.

In the Skill testing is enabled in: field at the top left, choose Development to enable the testing window.
Time to Test!
Try prompting “Start funnybot.” The skill will answer with a greeting answer. Once you’ve done that, you can follow your conversation as if you were using your bot in another context (test chat, webchat, Messenger, etc.). Type “Can you tell me a joke?” and see what happens!

Of course, you can mix both messages and directly ask Alexa “Ask funnybot to tell me a joke”. Again, the most important thing is having the invocation keyword in your sentence.

If you change something in your bot, you don’t have to “rebuild” your Alexa connection. Just refresh the Test page and start a new conversation. Don’t forget to use your invocation before any questions to your bot.
Next Steps
Congrats! You now have a talking Alexa chatbot, backed by SAP Conversational AI.
When you’re ready for production and to make your skill available to every Alexa owner, follow the instructions on your Amazon Alexa dev page on the Distribution tab.
That’s it, you know everything! Enjoy experimenting.


7 Comments
This is really helpful and informative, as this gave me more insight to create more ideas and solutions for my plan. Quality content is the key to attract readers. This article really helped me a lot.
ReplyDeleteChatbot Developers in Dubai
Facebook Chatbot in Dubai
AI Chatbot in Dubai
Artificial intelligence Company in Dubai
I really like your technique of writing a blog. I book marked it to my bookmark site list and will be checking back in the near future. Take a look at my website as well and let me know your opinion.
ReplyDeleteChatbot Company in India
Chatbot Development Company in India
Chatbot Development Company in Chennai
Chatbot in Chennai
I like your post very much. It is very much useful for my research. I hope you to share more info about this. Keep posting!!
ReplyDeleteNice post, very useful blogs with very useful information, thank you for sharing this post.alexa skill development
ReplyDeleteGet the best furniture manufacturers in delhi ncr for more info visit our site
ReplyDeletetop Sofa Manufacturers in Delhi
Sofa set manufacturers in Delhi
Get the best and cheapest sound systems led wals lfd screen and more other components on rent for more info visit our site
ReplyDeleteProjector on rent
4K LED TV on rent
Sound system on rent
LED Wall on rent
I really like your technique of writing a blog. I book marked it to my bookmark site list and will be checking back in the near future. Take a look at my website as well and let me know your opinion.
ReplyDeleteChatbot Company in Dubai
Chatbot Companies in Dubai
Chatbot Development
AI Chatbot Development
Chatbot Companies in UAE
Chatbot Company in Chennai
Chatbot Company in Mumbai
Chatbot Company in Delhi
Chatbot Development Companies